How to Delete Unnecessary Drivers on Windows PCs

One of your drivers could not work properly? Mistakenly installed outdated, incompatible or damaged drivers for your hardware? Wanna delete older versions of AMD or Nvidia driver from your computer? Drivers are must-have software to keep your Windows PC function smoothly. But if you have any driver issue, or you desired to get rid of old drivers which may occupy megabytes of space in your hard drive, you can easily remove those unnecessary drivers, as well as clean the driver packages.
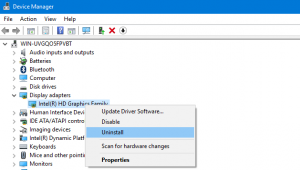
To uninstall problematic device or its driver, you will need to utilize Device Manager app. Windows 10 users can type Device Manager in the Start search box, and click on it from the result list. You can also right click on the Start menu and choose Device Manager option to launch this application. Then locate the device that contains problematic driver in the left hand, and double click on it (or right click on it and choose Properties option) to bring up the Properties window. In the opened window, select the Driver tab, and click on Uninstall button below. As a confirmation dialog pops up, check the “Delete the driver software for this device” box, and click on OK to start the uninstallation. This selected driver will be automatically removed.

By default, Windows 10 will automatically installs new device drivers when they are available, but it won’t automatically delete the copies of previous versions of drivers. To free up the disk space, you can manually delete previous version of drivers.
Here are the steps to delete unnecessary drivers in Windows 10:
1.Open the File Explorer from Start menu, and click on This PC in the sidebar.
2.Right click on the drive where you install Windows 10, and click on Properties.
3.Under the General tab, click on Disk Cleanup button to start the calculation.
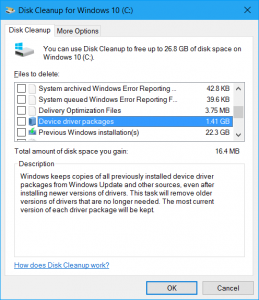
4.As the Disk Cleanup dialog pops up, click on the “Clean up system files” button.
5.Check the box labelled “Device drive packages”, and then click OK button.
6.When prompted, click on Delete Files button in the confirmation dialog.

So that’s it. Quite easy to handle, right? Follow us if you are interested in technology.
